


Have you ever thought about learning business process management or CRM with Pega but got discouraged by the complexity of setting up your own learning environment? What if I told you that combining Pega with Proxmox could be your golden ticket? This combo might seem a bit unconventional at first glance, but it’s like peanut butter and jelly once you get the hang of it. Stick around, and I’ll walk you through the why’s and how’s of effortlessly getting Pega Personal Edition up and running on Proxmox.
Why Combine Pega and Proxmox?
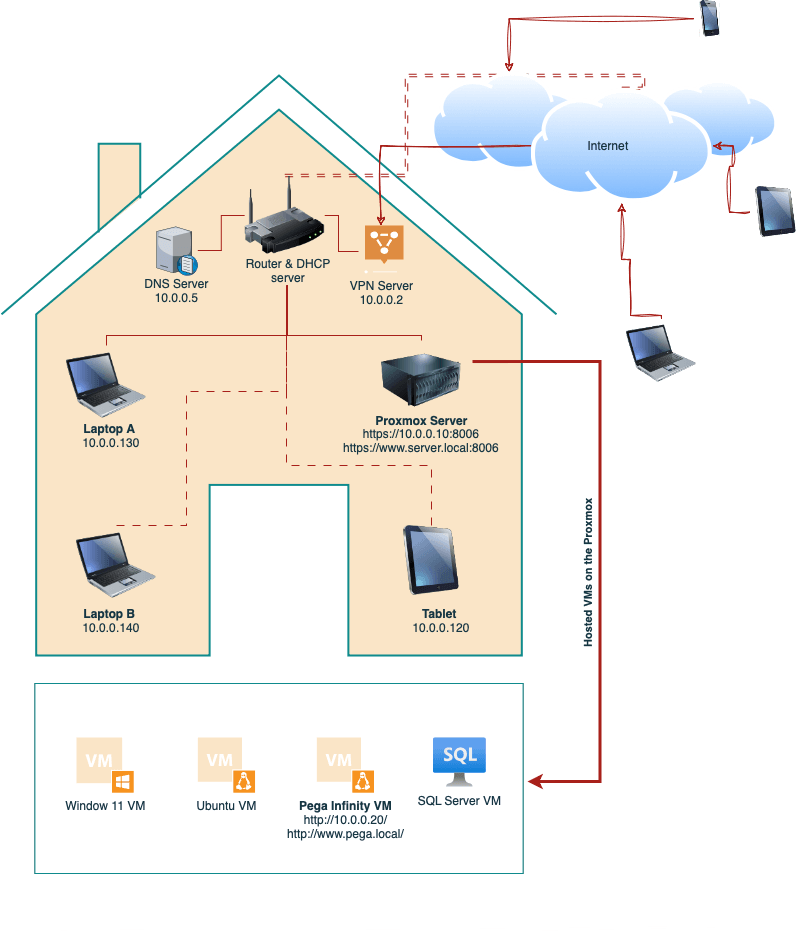
Combining Pega and Proxmox offers an exceptional learning playground for enthusiasts and professionals. Running Pega on Proxmox can provide a robust, scalable environment to test, learn, and develop without impacting your actual hardware resources. It’s like having your private sandbox where you can build castles or dig to the center of the earth without any risk.
Advantages of running Pega on Proxmox for learners
- Scalability: Easily adjust resources for your Pega environment depending on your requirements.
- Isolation: Mess up without any fear. You can always revert to a snapshot or set up a new VM within minutes.
- Accessibility: Access your Pega environment from any machine within the local network, or from anywhere, anytime, with the use of a vpn.
Setting Up Your Environment
Before we get into download or installation. We need to consider a pre installation checklist.
Pre-installation Checklist
- System requirements for Pega Personal Edition: Ensure your Proxmox server has at least 8 GB of RAM (preferable is more than 8gb) and a couple of cores to spare. More is always better.
- Preparing your Proxmox environment: get the latest version of the proxmox and make sure you have enough storage space on your local machine.
- Networking considerations: Plan how your VM will connect to the network. Will it be bridged, using its own IP, or will NAT suffice?
Installing Proxmox VE
Here i will guide you step by step, how to Get Proxmox installed, which is quit straightforward:
lets get the proxmox VE ISO from the offication website. You can search for proxmox download link on google and get link. If you are lazy like me, i put you here the download landing page for proxmox. https://www.proxmox.com/en/downloads
After downloading the ISO file, we need to create a bootable usb drive using etcher or any other tool, in order to install the proxmox on our Server machine. After we are done with the making our usb drive bootable, we need to plug it into your server machine and restart our machine and get into the BIOS by pressing either del key or F2 depends on your machine manufacture and change default boot device to USB drive. Save changes, system will reboot again.
Follow the installation wizard, remember your disk will be wiped completely, back up important data first and before installing proxmox. Once installed, you will see the domain name and port number, which is basically 8006, to access the web portal of your proxmox. User name for the login will be root and password is what you gave during the installation wizard.
Downloading Pega Infinity OVF and Moving to Proxmox
Downloading Pega Infinity 24.2 (OVA Extension)
Quick heads up, we are so far so good but still long way to go: in order to get pega VM we need a Pega account for this. So we Head over to the Pega Academy website, you will find the pega Infinity 24.2 or pega Infinity 23.1 by getting into Lead system architect mission, and download the OVA file. Keep in mind it might be pretty sizable.
Methods for transferring the OVA file to Proxmox:
Now we need to worry how to transfer the compressed file of our virtual machine from our local machine (laptop or desktop) to our server. I figure out two ways to achieve this. Both cases are conventional and will go step by step, explain you how to do it either using a usb drive or just transfer vis ssh.
- Using a USB drive: Using usb drive is helpful when your local machine (laptop, desktop) does connect to server wirelessly. So transferring through ssh may be a little slow but its upto you and your network setup. Less talk, lets copy the downloaded OVA to a USB drive and plug in the USB drive, mount the usb drive to a path using this command (linux command here), well we are already done here.
- Transferring via SSH: one of the simplest way to transfer our compressed VM to our server is using SSH, you use this step either you have no usb, or you just lazy to move arround 🙂 . so lets start. First if you are using Mac you have to open your terminal and navigate to the path you downloaded your pega compressed file. Which is normally your download folder.
Now use the following command to copy and paste on the Terminal:
scp /path/to/folder/downloadedfile.ova root@yourserverip:/tmpFollow with your proxmox root password. It may take a bit time
If your using windows open your cmd use the same command
Importing OVF on Proxmox
So we are now half way there, we have already transferred the compressed vm, we ssh to our proxmox server using ssh and navigate to the tmp folder where we transferred our compress file. After navigating to the tmp folder what we need now is to extract the ova file using tar:
tar -xvf LinuxLite-Pega242.ovaAfter extracting the ova file, we need to import the vm to the proxmox using qm importovf command.
qm importovf 102 LinuxLite-Pega242.ovf local-lvm --format qcow2 or
qm importovf 102 LinuxLite-Pega242.ovf local-lvm --format raw| Feature | RAW | QCOW2 |
|---|---|---|
| Snapshot Support | No | Yes |
| Compression | No | Yes |
| Dynamic Sizing | No (fixed Size) | Yes |
| Performance | Faster (more efficient) | Slightly slower due to features |
| Storage Efficiency | Uses full space regardless of data | More efficient with dynamic sizing |
| Use Case | Ideal for raw performance or simplicity | Ideal for flexible, feature-rich setups. |
Which to Choose?
- Use
qcow2if you want features like snapshots, compression, or dynamic disk sizing. - Use
rawif you need the best performance with a simple disk structure and are not concerned about features like compression or snapshots.
In general, for most Proxmox use cases, qcow2 is preferred unless you have specific reasons to avoid its overhead (e.g., if you need maximum disk performance for specific workloads).
Now we are done with importing, and lets start our vm on proxmox.
Post-Import Configuration and Testing
Starting VM and Updating Packages
Once imported, we need to update the RAM size for the VM on proxmox, and also remember to add new Networking device by going to the proxmox vm Hardware > Add Hardware and select Network Device.
start your VM and check for any package updates. Using apt get update and apt get upgrade commands. Keeping your system updated is crucial for both security and performance.
Assigning Static IP Address for the Pega Server
To avoid hunting for the IP address every time your VM restarts, assign a static IP. Proxmox and your router’s DHCP setting can help with this. To find what ip is currently assigned to the pega vm, you can open the terminal on the pega vm and type the following command to find the ip address.
Optional – Using Any DNS Server to assign the pega Server a Domain Name
If you’re feeling fancy, you can set up a domain name for your Pega server through a DNS server like Pi-hole. It’s a nice touch, especially if you plan to showcase your professionality ;).

