
Rule or Data type delegation in Pega is one of the platform’s most effective ways to give business teams controlled flexibility. Instead of routing every small policy adjustment through IT, Pega allows selected rules to be edited directly by authorized business users, while maintaining governance, audit-ability, and structured change management.
This guide explains what rule delegation is, why organizations rely on it, how it works behind the scenes, and the best practices for enabling it safely in production. It also explores real‑world examples and how delegated rules appear in both standard and custom portals.
What Is Rule Delegation in Pega?
Rule delegation allows developers to identify certain rules, typically small pieces of business logic, that can be safely updated by business users without needing a full development cycle.
Commonly delegated rule types include:
- Decision tables and decision trees
- Map values
- Service‑Level Agreements (SLAs)
- Correspondence and paragraph rules
- Data types configured for local storage (fields, dropdown values, simple datasets)
These are rules that business subject‑matter experts are comfortable adjusting because the logic is usually table‑driven, date‑driven, threshold‑driven, or content‑driven.
With delegation, a team can modify business logic directly in production, without deploying new rulesets or waiting for sprint cycles.
Why Organizations Use Delegation
Business environments change quickly:
- Pricing thresholds change due to market conditions
- Approval limits evolve with new compliance rules
- Notification timing shifts during peak seasons
- Email templates need adjustments based on customer feedback
- Routing logic must adjust as team structures evolve
Delegation empowers business users to modify this type of logic on their own. The benefits include:
- Faster response to business and regulatory changes
- Reduced IT involvement for minor updates
- Governed, role‑based control over who can change what
- Fewer production deployments required for small adjustments
Delegation works best for rules that are simple, non‑technical, change frequently, and belong to the business rather than IT.
Real‑World Examples of Rule Delegation
Example 1: Loan Approval Thresholds
A financial institution regularly adjusts its loan approval thresholds based on market interest rates.
Instead of raising tickets for IT to modify a decision table, the risk management team can update the threshold values instantly through their manager portal.
Example 2: Customer Communication Templates
Marketing teams often update email messages and SMS templates. With delegated correspondence rules, they can modify wording, tone, disclaimers, or seasonal messages without waiting for a deployment.
Example 3: Escalation Timings in SLAs
During holiday seasons, customer support teams may need to extend response times. An SLA rule delegation allows them to adjust the escalation schedule directly.
Example 4: Routing Rules for Case Assignment
If an operations team needs to temporarily reroute work to a backup group, perhaps due to staff shortages—they can update a decision table or map value without calling IT.
These scenarios show why delegation is essential in dynamic business environments.
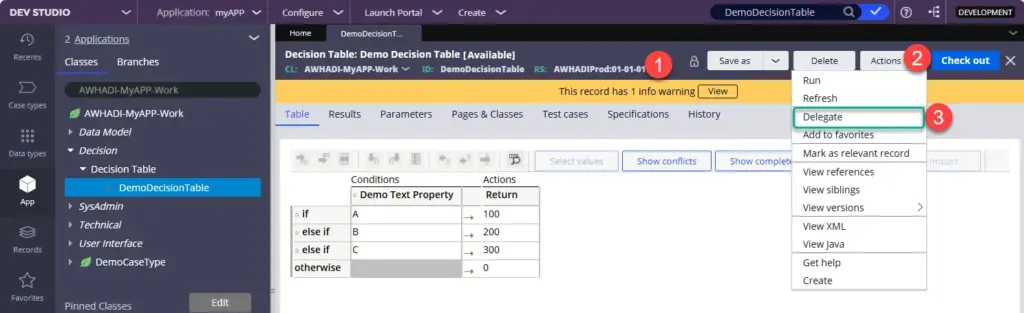
What Happens Behind the Scenes When You Delegate a Rule
Delegation is not just a UI shortcut. Several important things happen internally. Lets deep dive into it.
1. The Rule Itself Stays in Its Ruleset
The underlying rule remains where it was created.However, for the rule to be editable in production, it must be located in an unlocked production ruleset. If it stays in a locked application ruleset, business users will only be able to view it, not adjust it.
Remember that delegating a data type does not require the class itself to be stored in a production ruleset.
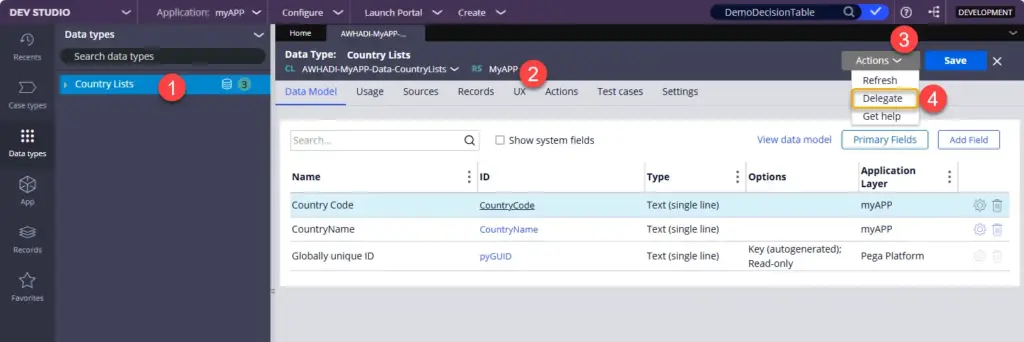
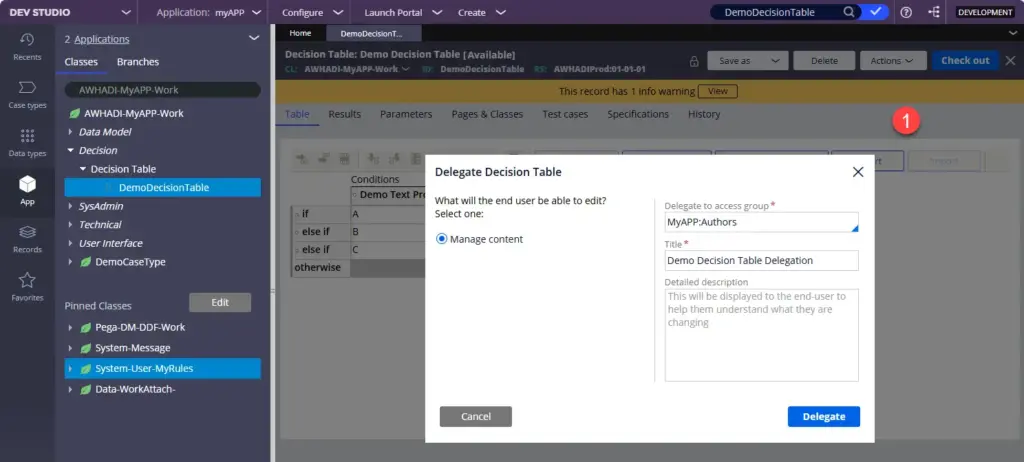
2. Pega Creates a System‑User‑MyRules Instance
When you use Actions → Delegate, Pega creates a metadata record:
- Class:
System-User-MyRules - Type:
DelegateAG - Key: The chosen Access Group
This delegation instance determines, Who with which access group can sees and can edit the delegated rule or rules.
3. Delegation Is Environment‑Specific
This is one of the most misunderstood points. Delegating a rule in Dev does not automatically cause it to appear in QA, UAT, or Production. Thats why it should be included in the product, in order to deploy.
Here’s why:
- The rule itself migrates as normal.
- But delegation metadata (System‑User‑MyRules entries) is data, not a rule.
- Data must be packaged separately in Product or recreated in higher environments manually.
If you skip this step, the rule appears in production but does not show up in the “Delegated Rules” list for business users.
Best Practices for Delegating Rules
1. Use Production Rulesets for Delegated Rules
Production rulesets should be:
- Defined in the application’s Production Ruleset list
- Unlocked in production
- Used only for rules meant to be edited by business users
A clean, minimal production ruleset makes governance far easier.
2. Keep Production Rulesets Lean
As part of using Pega best practices, Include only rules that truly need to be modified by business users. Avoid putting core application rules or complex technical rules here.
3. Delegate to Access Groups, Not Users
Delegation in Pega is designed primarily around Access Groups, not individual users. When delegating a rule, the recommended approach is to select the Access Group that represents the business role responsible for maintaining that piece of logic. This keeps governance simple, makes deployments predictable, and ensures that access scales naturally as team membership changes.
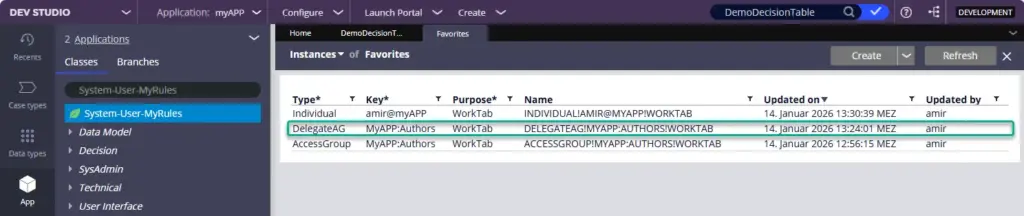
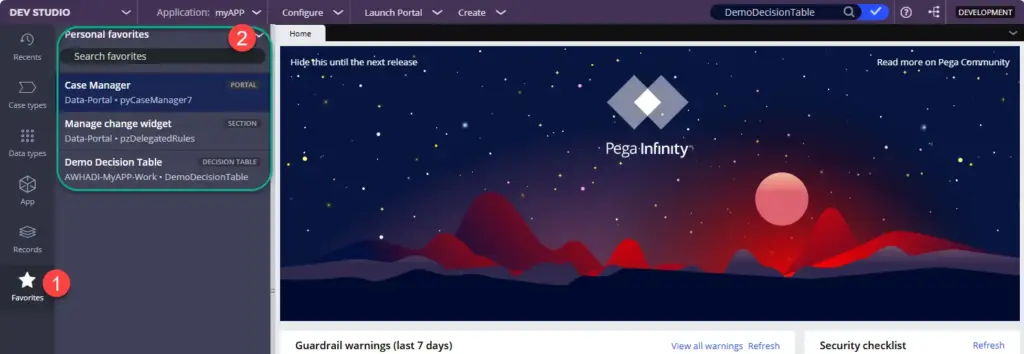
However, when you examine the underlying data in System‑User‑MyRules, you will notice that Pega also creates entries for individual users. These entries typically have keys corresponding directly to an Operator ID, and their purpose is usually marked as WorkTab. These are not delegated rules in the true sense; they are favorite rules, created when a user marks a rule as a personal favorite or when the “Add to Favorites” feature is used without delegating to an Access Group. Not to forget, Favorite Rules can also be defined for access groups.
These “favorite” entries appear under the Favorites tab in Dev Studio and are intended for personal quick access, not business‑level delegation. Thus:
Delegated rules (DelegateAG) → tied to an Access Group, visible in end‑user portals for business editing.
Favorite rules (Individual) → tied to an Operator ID, visible only to that user in Dev Studio under Favorites.
Understanding this distinction helps avoid confusion when reviewing System‑User‑MyRules records and reinforces why delegating to Access Groups is the correct method for making rules available to business users in production.
This ensures:
- Easier propagation to higher environments
- Centralized access control
- Less maintenance as team membership changes
- Alignment with the internal structure of System‑User‑MyRules
This doesn’t mean all users with that Access Group can edit the rule.
Users must also have:1.The production ruleset in their Access Group
2.Proper privileges (e.g., UpdateLimitedForm)
3.A portal that displays delegated rules
4. Treat Delegation Metadata Like Deployable Assets
Include System‑User‑MyRules instances in your:
- Product rule
- Deployment pipeline
- Change management process
Without this, the delegation configuration disappears in higher environments.
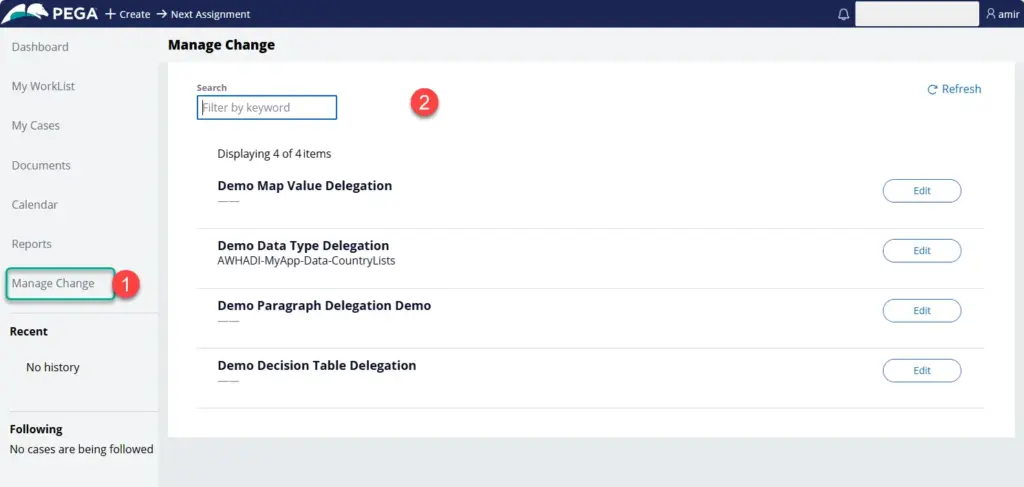
How to Expose Delegated Rules in a Custom Portal/Pega OOTB Portals
By default, delegated rules appear in:
- Case Manager Portal (mainly for Theme Cosmos applications: for learning purpose you may need to add the pyCaseManager7 / pyCaseManager portal to your access group, in case you are not able to see case manager portal under launch Portal, Note: the Portal is deprecated)
- Custom portals.
But custom portals require additional steps.
Use Pega’s Standard Widget
Pega provides an out‑of‑the‑box section called pzDelegatedRules, defined in the Data‑Portal class. This rule is marked final, meaning it cannot be modified or saved into another ruleset. The section is not intended as a standard layout component; instead, it is designed to be used as a Dashboard widget.
The pzDelegatedRules widget reads from System‑User‑MyRules entries and displays all rules delegated to the currently logged‑in user or to their Access Groups. Because the rule is final, you cannot customize its behavior, but you can embed the widget directly into any portal harness or dashboard region that supports dashboard widgets.
This allows custom portals to display delegated rules without building a custom data page or UI component, since the OOTB widget already handles fetching and displaying delegation records.

How to Delegate a Rule: Quick Checklist
- Move or copy the rule into an unlocked production ruleset
- Open the rule in Dev Studio
- Click Actions → Delegate
- Select the target Access Group
- Add a meaningful label for business users
- Save and commit
- Package both the rule and delegation metadata for deployment
- Confirm the delegated rule appears in the portal
How to Remove Delegated Rules in Pega?
Sometimes delegated rules need to be cleaned up, maybe a rule was delegated by mistake, the business no longer needs access, or the list of delegated rules for an Access Group has changed. As explained before, in Pega, delegation is not stored on the rule itself. Instead, all delegation information is stored as metadata in the System‑User‑MyRules class.
When a rule is delegated to an Access Group, Pega creates a single instance of type DelegateAG for that Access Group. Inside that one instance, Pega stores the entire list of delegated rules for that group. This is important:
- Delegating five rules to the same Access Group does not create five instances
- Instead, all delegated rules are added to one metadata row
This is why removing delegation can be done in two different ways depending on whether you want to remove all delegated rules for that Access Group, or only one specific rule. and removal actions ofcourse require access to Dev Studio.
Option 1 — Remove ALL Delegated Rules Meta Data for an Access Group
If your goal is to remove all delegation metadata for an Access Group (i.e., clear the whole list in one action), follow these steps:
- Open Dev Studio
- In the App Explorer, search for the class:
System-User-MyRules - Open the class and list its instances
- Locate the DelegateAG instance for the relevant Access Group
- Each Access Group has its own DelegateAG row
- Open the instance
- Click Delete
- Save
This deletes the entire metadata record, effectively removing all delegated rules for that Access Group at once.

Removing delegation metadata in DEV does not produce deployable artifacts. Delegation metadata is environment-specific, so deletions cannot be packaged and moved to another environment.
If the cleanup is meant for Production, you must:
Perform the deletion directly in Production (with proper approvals and access),
because there is no out‑of‑the‑box way to “deploy a deletion” of a System‑User‑MyRules instance.
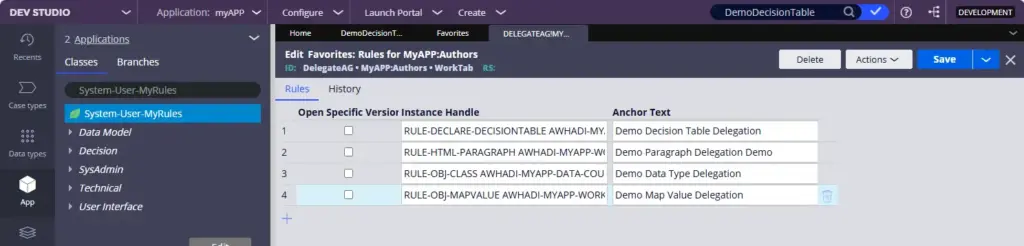
Option 2 — Remove ONLY Specific Delegated Rule from within delegation meta data of an Access group.
If you want to remove only one delegated rule and leave the others intact, you must edit the metadata inside the relevant DelegateAG instance.
- Open Dev Studio
- Search for the class:
System-User-MyRules - Click on the class and list its instances
- Locate the DelegateAG instance for the Access Group (not the operator‑level favorites)
- Open the instance
- Navigate to the Rules tab
- This tab lists all rules delegated to that Access Group
- Find the specific delegated rule
- Click the trash icon next to the Anchor Text column
- Save the instance
This removes only the selected delegated rule from the metadata while keeping the rest intact.

Deployment note
If the DelegateAG metadata already exists in a higher environment:
- Add the modified
System‑User‑MyRulesinstance to your Product rule - Redeploy it to QA, UAT, or Production
Remember: Delegation metadata does not automatically move through environments, you must explicitly package and deploy any changes.